
Dell laptops are equipped with many great tools and features. Screenshots are one such feature that comes in handy when troubleshooting or documenting a problem on your computer or laptop.
The process and steps to take screenshots vary slightly depending on the type of laptop. And there are many ways to capture a screenshot on Dell laptops.
This guide will show you how to screenshot on Dell laptops.
What is a Screenshot?
A screenshot is a picture that you take of your computer (PC), laptop, Tablet, Macbook, or mobile screen.
You can use screenshots to keep track of what you’re doing on your laptop or as a quick way to show someone what you see on your screen.
It’s also one of many ways to save content that you see online, like an interesting video or funny tweet. Once it’s saved, it will be much easier for you to share with others later on.
If all that sounds good, let’s learn how to take a screenshot with your Dell laptop!
How To Screenshot On Dell Laptops
There are many ways to screenshot dell’s computer screen and we will cover all the ways in this article.
Capturing a screenshot on windows dell laptops is possible either by using a keyboard or by using a windows tool.
1. By Using Only “PrntScr” or “PrtSc” Key
In order to capture a screenshot on windows, first of all, locate the print screen (PrntScr) key on your dell keyboard.
The “PrntScr” key is normally located on the first row of the keyboard, before or after the F12 key. The location of the key depends on which dell laptop version you are using.

To screenshot dell screen just press the “PrntScr” once. This action will not save the screenshot on your dell laptop.
Instead, this action will capture the entire screen and will copy the screenshot to the clipboard.
After pressing the print screen key, open the paint app and paste (Ctrl + V) the screenshot to the paint app.

The main drawback of this method (Press only PrntScr) is that it will capture the entire screen of the laptop. And it will not screenshot a particular area of dell’s computer screen.
2. Using “PrntScr” + “Windows Key” Keyboard Shortcut
By pressing just the “PrntScr” key, it will copy the screenshot to the clipboard, and then you have to copy and paste it into the paint app before saving it as a file on the laptop.
Whereas, by pressing both the “PrntScr” and “Windows” keys on your dell laptop at the same time, you can directly save the screen screenshot on your dell laptop in a PNG file.
The computer will automatically save the screenshot on dell. To check out where your captured screenshots are saved, just go to the Pictures folder and then the Screenshots folder.

The main drawback of this method ( PrntScr+windows key) is that it will also capture the entire screen of the laptop.
3. Capture Specific Window
If you don’t want to capture the entire window screen, then windows also have a keyboard shortcut to capture a specific window.
You need to press 3 keys at once. The “Windows” key, the “S” alphabet key, and the “shift” key of your dell laptop.
The moment you will tap on S+Windows logo+Shift, the Snip and Sketch tool window will appear at the top of the screen.

The Snip and Sketch tool window will have 4 options that are:
- Rectangular Snip to draw a box around a specific window you wanna capture
- Freeform Snip to draw a shape around a specific window you wanna capture
- Window Snip to select a particular window to capture or screenshot
- Fullscreen Snip to screenshot the entire window on the dell laptop
Once the specific window is selected, the snipping tool will immediately capture that and will save it to the clipboard.
The snip and sketch preview will appear at the bottom of the screen to show the captured screenshot.
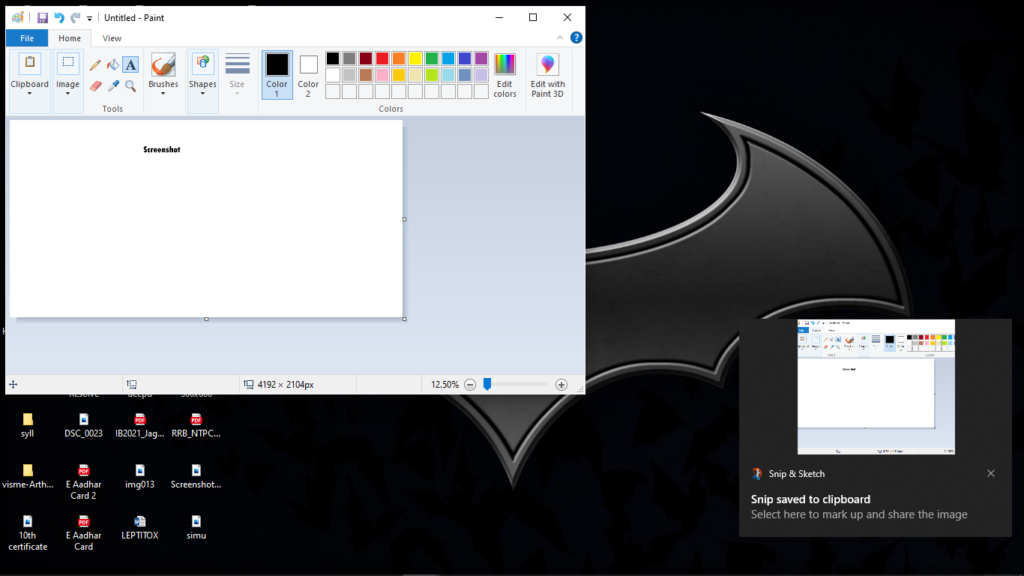
The preview window will say “snip saved to clipboard” and if you want to edit that screenshot, just tap on it to open it on the Snip and Sketch tool.

With a snip and sketch tool, you can edit your taken screenshot of a specific area.
Crop it, write on it, or do anything with it before saving the file on your dell laptop.
The file (screenshot) will be saved as a PNG file.
4. Use the Snipping tool
The old windows version has a snipping tool to take a screenshot on dell. And the new windows version has Snip and sketch tool to capture a screenshot.
The new dell laptops come with both the tools now. But the better tool is Snip and sketch tool having more additional features.
To open the snipping tool, search it on your dell laptop.

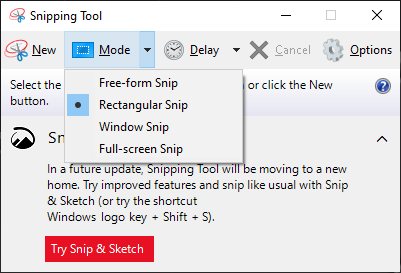
The snipping tool window will pop up. The snipping tool has various options. To take a new screenshot just click on New.
And Drag the cursor around the area you want to capture.

Remember to select the mode first, before taking a screenshot on dell. The modes are freeform snip, rectangular snip, window snip, and a fullscreen snip.
Select a particular mode and tap on new. And then select a specific area or a window to capture.
5. Delayed ScreenShot on Dell laptop
The best thing about both the tools (snipping tool and Snip & Sketch tool) is that they will allow you to capture a delayed screenshot.
This means the snip tools will take a few seconds to take a screenshot on dell.
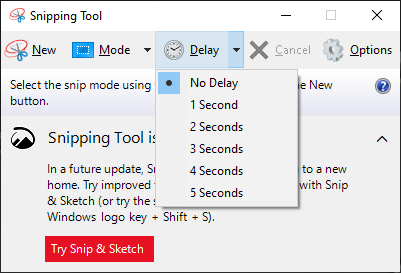
The snipping tool can delay the screenshot up to 5 seconds maximum.
Whereas the snip & sketch tool can delay the screenshot up to 10 seconds maximum. It has three options to capture a screenshot that is:
- Snip now
- Snip in 3 seconds
- Snip in 10 seconds
Where is a screenshot saved on a laptop?
Every version of Windows, save for Windows 8 and 10, includes a Print Screen button on your keyboard. When you press Print Screen, it copies whatever is currently on your screen to your clipboard and allows you to paste it into another application.
Note that when you take a screenshot in Windows, it will typically be saved as a PNG file located in C:\Users\your_username\Pictures\Screenshots on your hard drive.